
FAQ
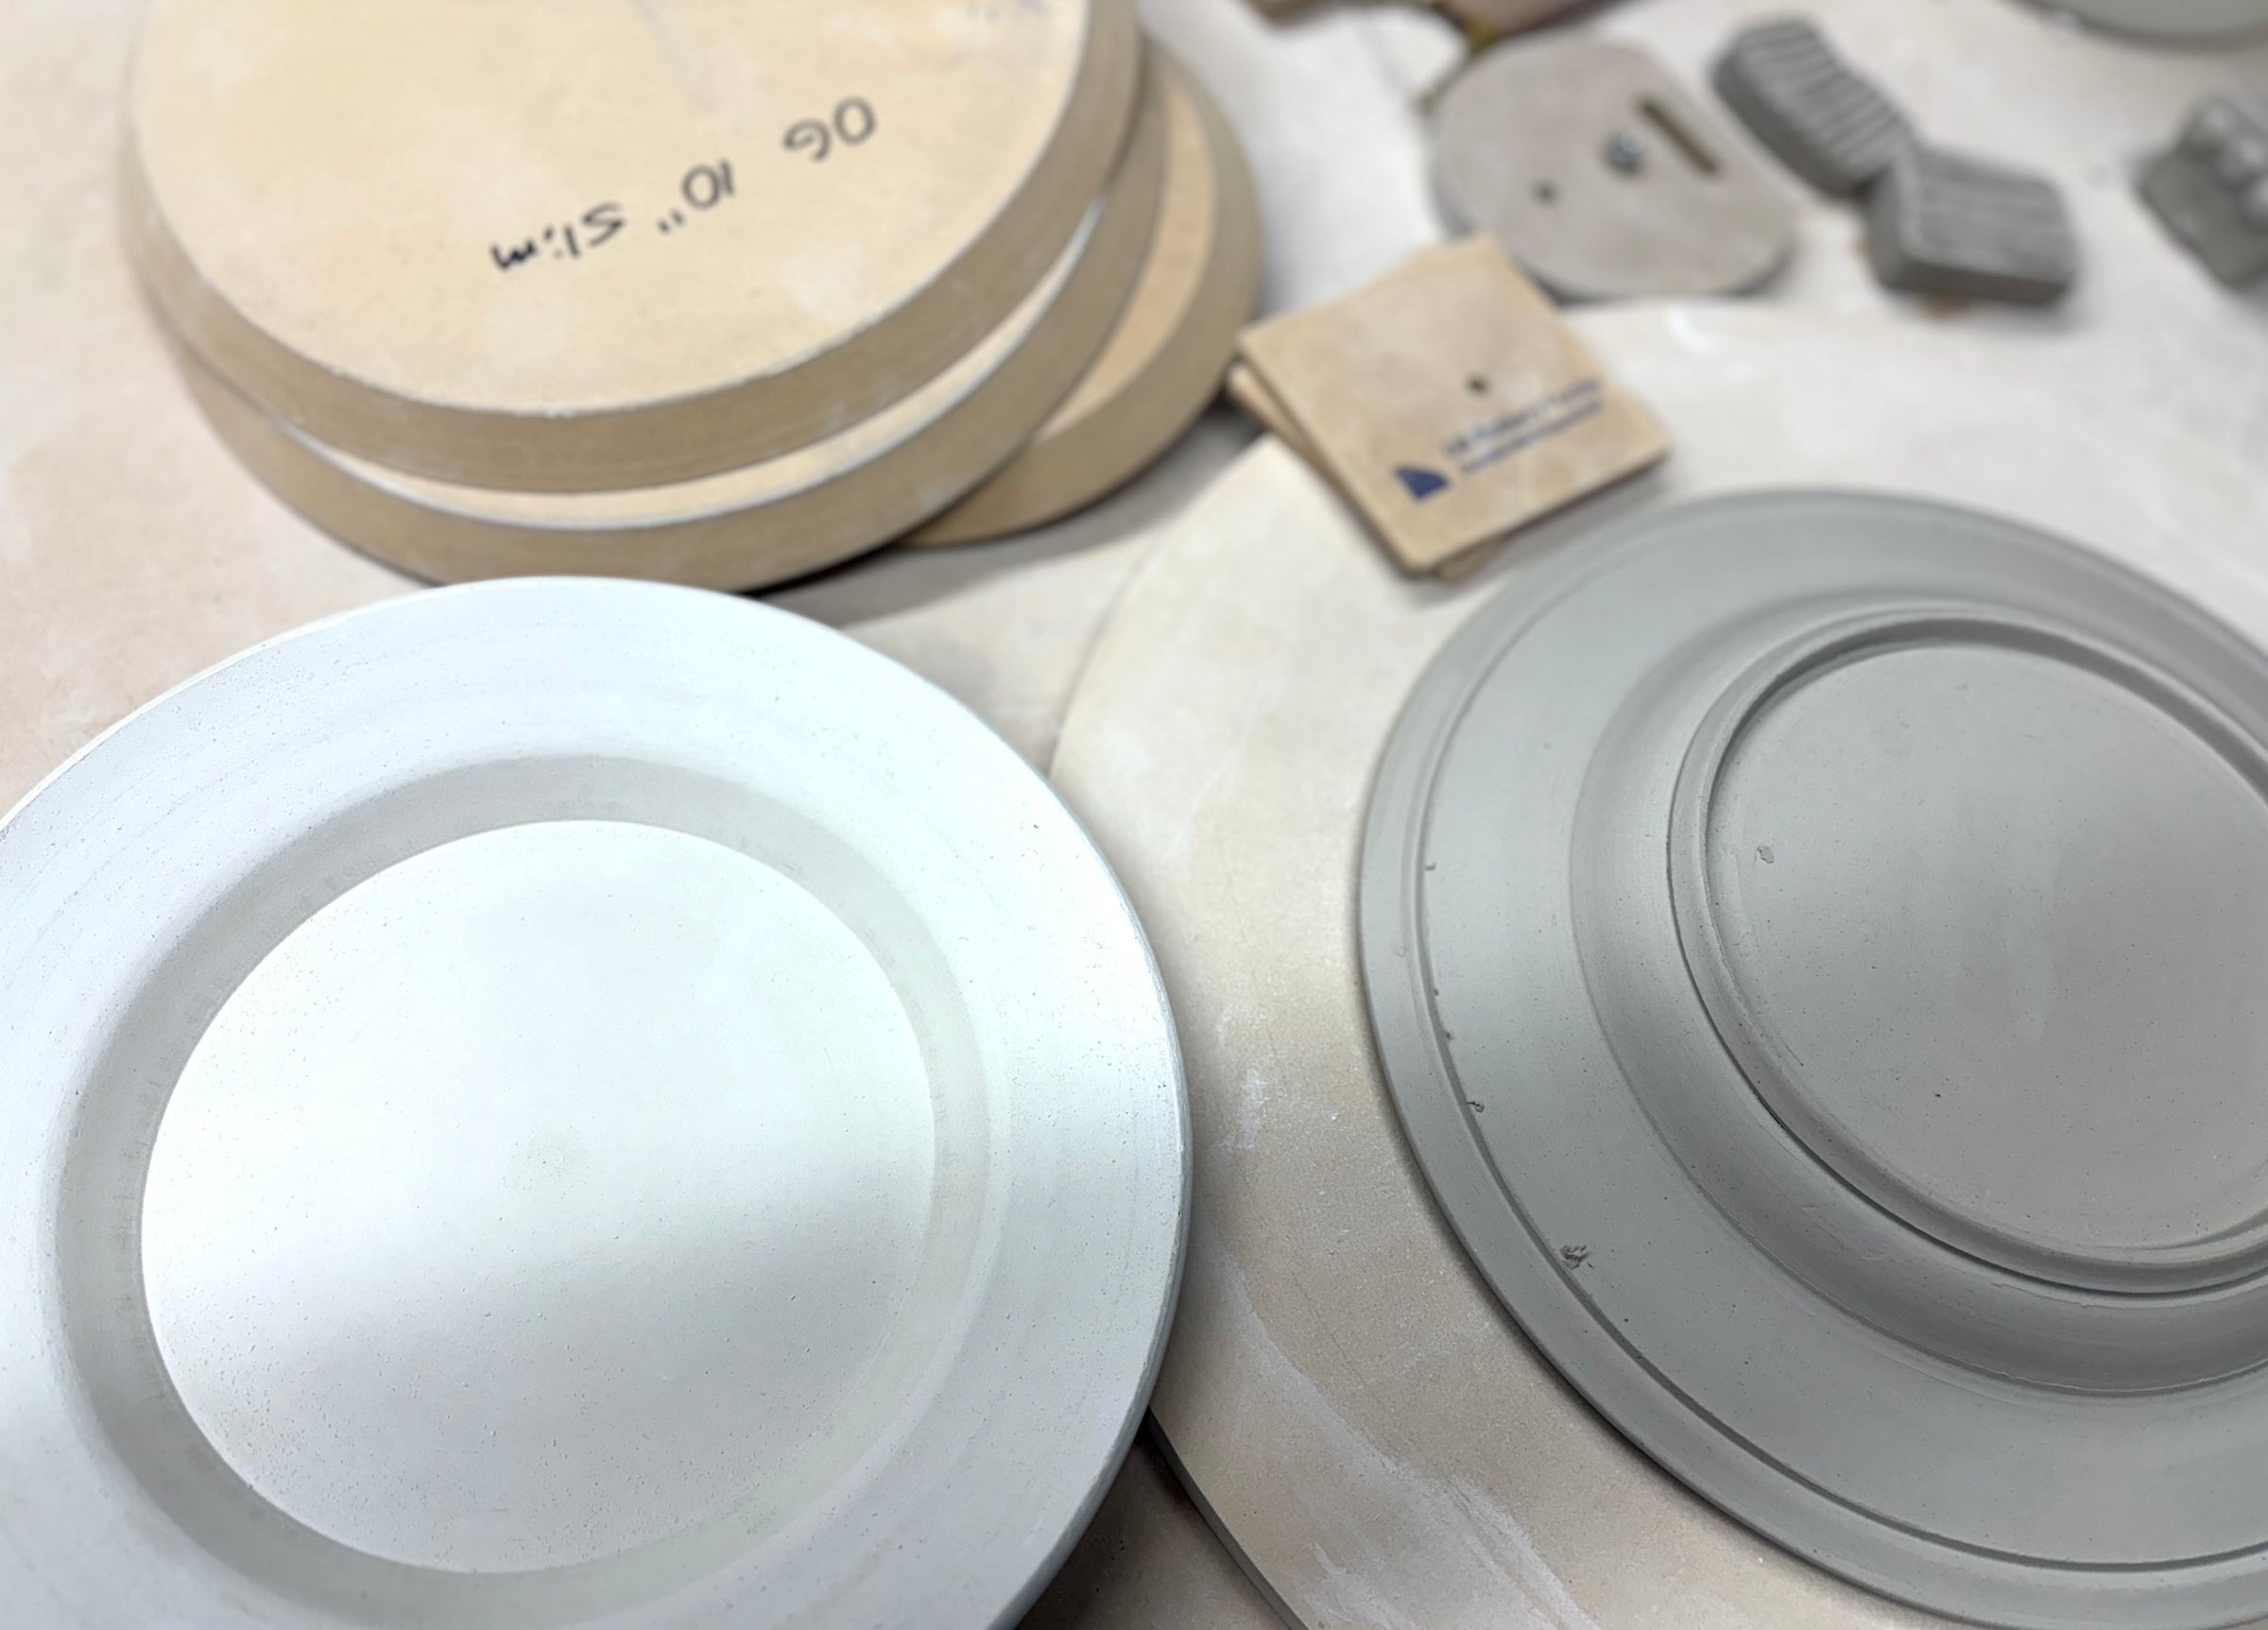
What are the Forms Made of?
expand_more
The Forms are made from medium density fiberboard.
The cut and beveled fiberboard makes them durable and economical. Our Forms are easy to use over and over again, giving you a tool to create your personalized pieces.
How do I care for the Forms?
expand_more
The Forms are MDF wood, so to make them last for thousands of uses make sure you let them dry in between each use, typically 24-48 hours.
The timing of making your piece and removing it from the Form is very similar to plaster. For the OG, RD2, and Slumpies it is our recommendation to leave your piece facedown on the Form until stiff, leather-hard before removing, typically 4-8 hours depending on climate. For the Wallies, you want to remove the Form from the clay as soon as you have finished adequately compressing and trimming; you can then use the Wallie Form multiple times in one making session.
If left on the Forms for too long, your clay will crack and the wood will mold or start to get soft. Mold can easily be wiped off with a damp cloth or sponge and a little dish soap. If the edges begin to become rough you can use sandpaper to smooth them, we recommend using 100 grit.
What determines the size of the Forms?
expand_more
Form sizes are measured from the flat, stamped back side of the Form which is also the largest part of the Form (this will be the outermost rim of your piece). Measurements are in inches.
If you are trying to determine what size to make, there are many factors involved. Factors would include: The size of your lip, shrinkage of clay, and firing temperature.
The Forms are designed to be shallow so they are more versatile, and many of our Forms are stackable. Each product description will indicate whether a Form is stackable, and which Form(s) they are stackable with.
Our OG Forms are 3/4" deep, with the exception of the OG Slims, which are 1/2" deep. The OG Forms have a 45 degree beveled edge, and a stark transition from base to rim. The interior base of the OG Forms measures 1.5" less than the outermost diameter.
Our RD2 Forms are 3/4" deep, with 2" spacing from base to rim and soft, rounded edges.
Our Slumpie Forms have three technical measurements: outermost exterior rim, interior rim, and interior base. The measurement indicated is the interior rim. The outermost exterior rim will be 2" greater than the indicated measurement, and the interior base will be 1.5" less than the indicated measurement. For example, the Slumpie 9.5" Round has an outermost exterior rim of 11.5", and an interior base of 8".
Our Wallie Forms have a straight, 90 degree or "walled" edge, and are 1" deep. The exception to this depth are the Wallie Baking Dish Forms, which range from 2-3" deep, and also have the option to add extenders for greater depth.
Deeper Form Options:
If you are looking for a deeper option, you can use the general rule that if a shape is 1.5" different in measurement it will stack with the size above or below it in the same shape and Form profile. Each product description will indicate whether a Form is stackable, and which Form(s) they are stackable with. We also offer "Stacks" to make this available to you as an even more cost effective bundle, as each Form within a Stack Pack is also usable on its own.
Due to the depth limitations of the MDF, we feel it is impractical to glue the wood together to make deeper shapes. However, we do have our Bowl Bundle and Wallie Baking Dish Forms that utilize a peg system to connect them together.
Learn MoreDo I need to use a release agent?
expand_more
No release agent, cleaning, or sealing necessary - in fact we recommend avoiding doing this as it can inhibit the Forms natural drying process.
How do I avoid warping?
expand_more
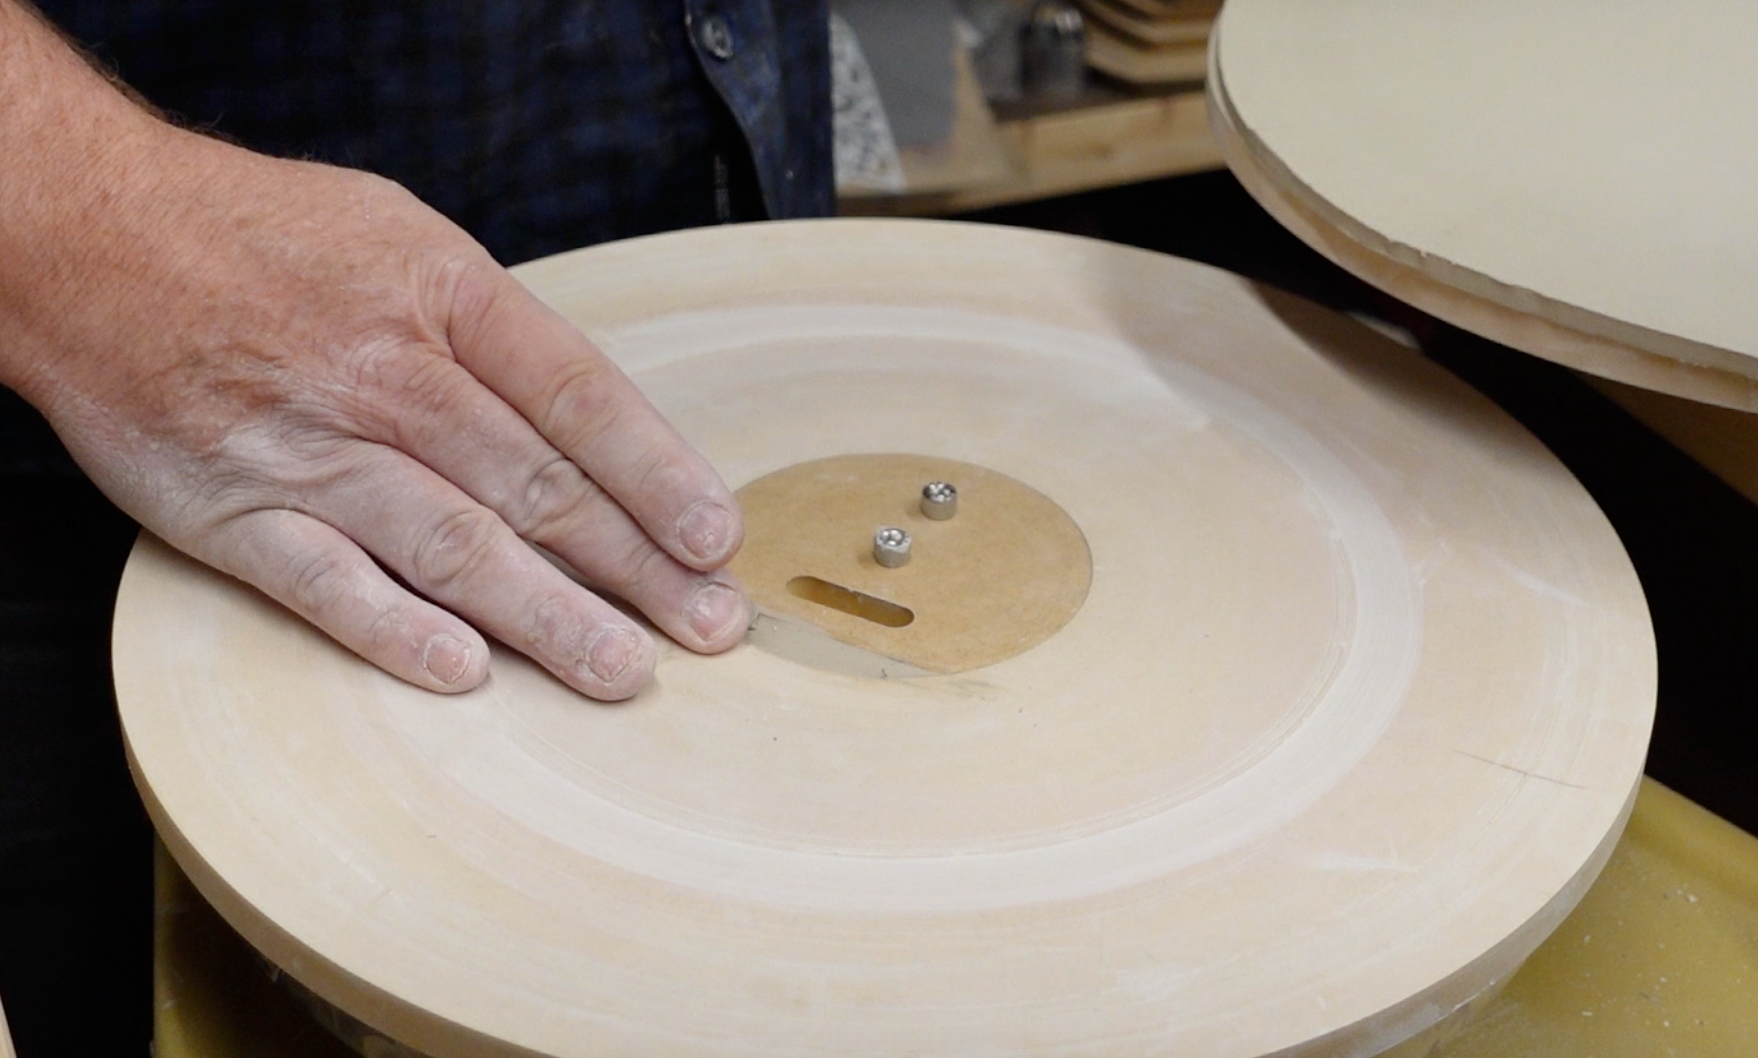
The first step to avoid warping is properly compressing one side of the slab completely. We then drape the slab over the Form, and compress the other side while it’s on the Form.
After compression and completing any foot or lip prep (adding spacer), we don’t touch the piece until it is stiff, leather-hard; there shouldn't be any resistance when removing the clay from the Form. You should be able to press a finger nail into the clay and leave a mark, but you should not be able to form an impression with the soft part of your finger.
If you are making objects with a lip you must use a spacer.
Once the clay is a stiff, leather-hard, we lift it off the Form. If it bends or moves in any way after lifting it off, you’ve taken it off too soon. We’ve found that removing the slab too soon is the single most significant factor towards warping the piece.
Also, trying to flip it over before it dries enough may result in the ends to start curling upward. We understand it can be difficult to “be there at the right time,” but the importance of removing the piece at the right time cannot be understated.
The second most common way the slabs will warp is that there is a draft in your room caused by a fan, heater, breeze or room air flow. Make sure to let the object dry evenly in a still area. Speed is not a factor. Plastic or the use of weighted sacks can also cause uneven drying.
Steps to Avoid Warping when Creating a Plate:
- Use a Slab Roller to roll-out the clay
- Use a Rib to compress the clay two different directions on one side
- Add texture if necessary
- Drape, the smooth/textured side down, of moist clay onto Form and press gently and evenly to sides to push out any air trapped underneath.
- Use Rib again to compress clay to the Form - firmly and evenly
- Cut strips of clay using Foot Maker
- Let piece and foot strips rest for about 20-30 minutes to stiffen clay slightly
- Score area and add water to score marks to then attach the feet
- Attach foot strips to create border around piece. No more than 1/2 an inch from edge and 8 inches from widest point
- Use Modeling Tool to clean the places where foot meets the body on all sides
- If the piece has a rim, lift off work surface and place a Spacer underneath
- Press the edge of the rim down to work surface to create a slight pitch
- Let piece set for 4-8 hours uncovered in non-draft area until edges start to curl up
- Key is even drying - not length of drying. Sometimes putting plastic on top creates uneven drying
- Now flip piece over without flexing or stretching the clay. Then press on inside center downward to level out any curling that might have happened
- Use Surform Rasp to clean edges and carve smooth any uneven areas
- Use EDGY to burnish the edges even smoother. With non-grog clay you can use a Sponge to smooth edges but do not get clay too wet
- Now is a great time to add your favorite underglaze or carve into piece
- Let dry and bisque fire. Stacking should not affect warping
How do I avoid "seams" when using the Stack Packs?
expand_more
Unfortunately, one of the disadvantages of stacking the Forms is that it is difficult to avoid creating small "seams" between them, as there will remain a small gap, typically 1/8" to 1/16" or less, unless the Forms themselves were glued together. Gluing the Forms together is a viable option if you do not intend to use the Forms individually. When we use Stacked Forms to create bowls or plates with greater depth, we have found it is most effective to use a rib or ribbon tool to smooth out the seam lines when the piece is a very stiff, leather-hard.
How do I avoid the foot popping off in the bisque fire?
expand_more
We’ve noticed that two things seem to cause the foot “popping off” in the bisque.
The first is when the body of the clay is still a little wet and is “rushed” into the bisque. Make sure that your piece is completely bone dry before bisque firing.
The second is when the foot is applied but is slightly wetter or drier than the body of the piece. This may cause the foot to separate from the body, especially at the ends. It is very important to make sure that the foot and body of the piece contain the same moisture level to increase adhesion. Additionally, make sure that when you apply the foot, you are thoroughly scoring and wetting both the bottom of the piece and the part of the foot that attaches to the piece.
How do I avoid distinct marks on my Forms?
expand_more
If over time your Form develops some marks or dings, you can gently sand down the Form edges to eliminate the appearance of distinct marks. We recommend using 100 grit sandpaper. Sanding or altering the wood will not affect its use.
Do you partner with non-profit organizations and/or accept donation requests?
expand_more
We focus our direct donations to our local community here in Grand Rapids, Michigan. We encourage anyone seeking donations or partnerships to reach out to one of our distributors in your area:https://grpotteryforms.com/pages/distributor-map(link opens in new tab/window)OR encourage any donors to purchase Forms for your organization, as donors often like to be able to purchase tangible items. While we can't always commit to a partnership, please know that we value the work you're doing in the arts community immensely!
Do you ship to Alaska/Hawaii/Internationally?
expand_more
Yes, we ship all over the world! Use the shipping calculator at checkout to see your shipping rates based on your address: please bear in mind that shipping rates change daily, and options listed are real-time costs for the various delivery services.
We also have over 80 distributors domestically and internationally, so be sure to see if there is a GR Pottery Forms distributor local to you! https://grpotteryforms.com/pages/distributor-map
What is your shipping and return policy?
expand_more
Order processing time
Typically, all orders are processed within 5 business days. Orders are not processed, shipped, or delivered on weekends or holidays.
If we are experiencing a high volume of orders, shipments may be delayed by a few days.
We will contact you with any information regarding backorders or delays.
Please allow additional days in transit for delivery.
Shipping rates & delivery estimates
Shipping charges for your order will be calculated and displayed at checkout.
Delivery delays can occasionally occur. GR Pottery Forms is not responsible for delivery delays.
Shipment confirmation & Order tracking
You will receive a Shipment Confirmation email once your order has shipped containing your tracking number(s). The tracking number will be active within 24 hours.
International Shipping
We do offer international shipping! Just add the desired items to your cart and choose your international shipping option during checkout. *hint, you can view your shipping options and cost without having to commit to the sale.
Customs, Duties and Taxes
GR Pottery Forms is not responsible for any customs and taxes applied to your order. All fees imposed during or after shipping are the responsibility of the customer (tariffs, taxes, etc.).
Damages
GR Pottery Forms is not liable for any products damaged or lost during shipping. If you received your order damaged, please contact us as soon as possible and we can file a claim on your behalf.
Please save all packaging materials and damaged goods before filing a claim.
Return Policy
Returns must be within 90 days of delivery.
Full refunds will not be issued for returns if the product has been used.
All items must be packed well to avoid damages while shipping.
Please include your order number in or on the return package.
Shipping and delivery fees are non-refundable.
If you believe you received a defective item, please reach out to customercare@grpotteryforms.com as soon as possible.
We cannot accept returns on items labeled as "seconds".
If you have questions about a return, please contact us and we will be happy to help.
Have a different question?
expand_more
Email us for assistance: customercare@grpotteryforms.com