It can be so frustrating to spend precious time on a piece, only to have a crack start to form in the drying process.
With past experience, and using some of the great information we found online, we came up with a list of the most common reasons why pieces crack and how you can prevent this from happening in the future. As well as different ways you can fix these dreaded cracks.
Some of the information has also been pulled from some amazing artists that have written books in this regard, and we have referenced them at the end of this article.

Crack Prevention:
A few of the most common causes for cracks in the clay are the drying process, the type of clay used and the way the clay was handled during the building process. However, the root of all cracks is stress.
I will be going more in-depth as to why cracks occur from these common issues:
Drying Process:
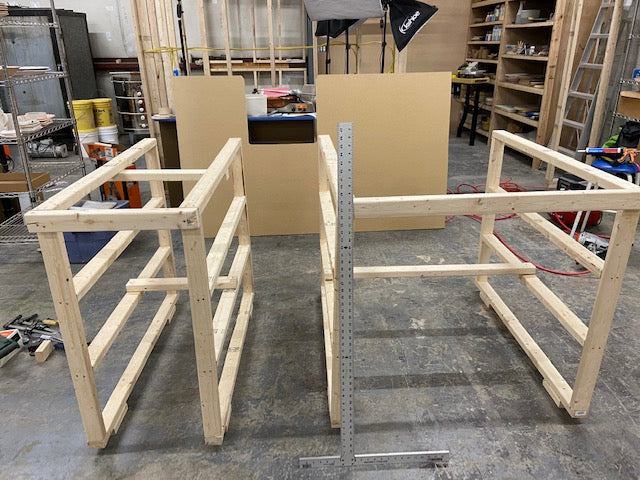
The weather can play a huge role in how fast or slow your work drys. A great solution to help control this is by getting a cart or rack with several shelves to place your work on; you can then place two sheets of plastic over it to better control the drying process (see example image below).

Image taken from YouTube: Drying Pots to Prevent Cracking
If the weather is humid, open up the plastic covering, but if it is really dry out then don't let any air inside your cart because it will make the clay dry much faster. You can prevent air from entering by adding clips to any openings of the plastic tarp.
Here are a few other reasons why cracks might occur in the drying process:
- Drying pottery too fast or unevenly.
- You may want to flip pieces over during the drying process so they dry more evenly.
- Firing at too high of a temperature, too long or too many times.
- Cooling the pottery too fast after coming out of the kiln.
- Don't open the kiln too soon, we recommend waiting until 100 degrees Celsius so it cools slowly.
- Making an attachment late in the drying game.
- Whenever two pieces of clay of different states of workability are joined, there is the potential for cracking.
- Greenware is the best stage to catch a crack and stop it in its tracks.
Type of Clay:
Clay with high plasticity tends to crack more when drying. The reason for this is because plastic clay has smaller clay particles, so there is more surface area in the clay for water to adhere to.
If you do use clay with plasticity it must be dried slowly and evenly. If one part of a clay object dries more rapidly than another, the unequal shrinkage between the two portions may cause warping or cracking. This may happen when a clay post is dried in the sun or in a place where a draft strikes one side.
Although porcelain clay is not a plastic clay body, it does have a high water content. As such, it is prone to shrink very quickly when drying which makes it at a higher risk of cracking.
Solution:
Start using clay with grog (grog is clay that has been fired and then ground up into granules.) Grog in clay reduces cracking during the drying process.
Clay with grog in it shrinks less because the fired clay that makes up the grog has less water content. Because clay with grog shrinks less, the pottery undergoes less stress during the drying process. As a result, it is less likely to crack.
If you would like to continue to use clay with plasticity just make sure it dries evenly and not too fast.
Clay Handling During the Building Process:
Here are some of the most common mistakes people make in the building process:
- Uneven clay thickness
- Slab is too thick
- Didn't compress the slab
- Adding water to a crack - instead use moist clay
- Not joining your pieces of clay well
- The pieces must have the same moisture level
- Scoring and slipping is sometimes necessary
- Glazing stress - Glaze pulls on the clay and causes shrinkage
- Here is an in-depth article on how to prevent "crazing": Crazing in Pottery: Why it happens and how to avoid it
Crack Repairing:
Repairing Bone-Dry Ware:
-
Your choices at the bone-dry stage are limited, so don’t waste a lot of time trying to repair a piece. At this point, if you do attempt to repair a crack, adding water, wet slip, or wet clay is a mistake.

- Instead, try to repair small cracks with paper clay.
- To do this, make a small amount of very thick slip with the same clay your piece is made of. In another container cover a wad of toilet paper with water and let it sit until the paper has broken down into pulp.
- You can speed this process by using an immersion blender. Wring out a small amount of the paper pulp and add it to the slip, then mix well. (Don’t add too much water, and let the slip dry out so it is the consistency of a sticky putty.) Then open the crack slightly by scoring it extremely well, to the score area add a bit of water if necessary to create a bit of roughness and stickiness, then pack the crack with the slip.
Repairing Bisqueware:
- If a crack has appeared after bisque firing you now need to repair bisqueware.
- If your crack is very very small, you may be able to hide it by filling it in with glaze. However, the glaze firing is hotter than the bisque firing, so there’s also a good chance your crack will continue to expand.
-
For cracks that require filling in, we’ve found that using commercial repair solutions, such as Amaco Bisque Fix and Bray Patch, are the best bets.

- Remember: Don’t waste precious time on a lost cause. If you find yourself repeatedly developing cracks in your work, step back and ask yourself some questions about your building methods, see if you can identify any common issues.
Sources:
Clay and Glazes for the Potter by Daniel Rhodes
Mastering Hand Building by Sunshine Cobb
The Potter's Dictionary of Materials and Techniques
How to dry your pottery without getting cracks

